Showing posts with label pretend play. Show all posts

Monday, 27 April 2015

Gone Fishing Game for Preschoolers

I can't wait to try this super fun and educational "fishing" game created by Tiffiny from Spark and Pook. Tiffiny is an elementary school teacher turned stay-at-home mom, blogging about playful learning ideas, children's books and traveling with kids. Be sure to check out her (free printable) Make Way for Duckling Matching Activities and her 10 Apples Up on Top Book Activity.

Gone Fishing Game

For my daughter’s third birthday party, I put together a game I call “Gone Fishing” using simple materials I happened to have around the house. The game was such a hit with Pooky and the other kids that I decided to share it with you. The game is quick to set up and provides oodles of educational fun (a win-win in my book).


What you will need:

- Gone Fishing Printable (or draw your own simple fish outlines)
- small dowel rod (you can also use a wooden spoon or unsharpened pencil)
- baker's twine, yarn, or some form of thick string (about 10-12 inches in length for each "fishing pole")
- construction paper or foam sheets in a variety of colors
- paper clips (one per fish)
- dot magnets
- a "pond" of some sort in which to place the fish
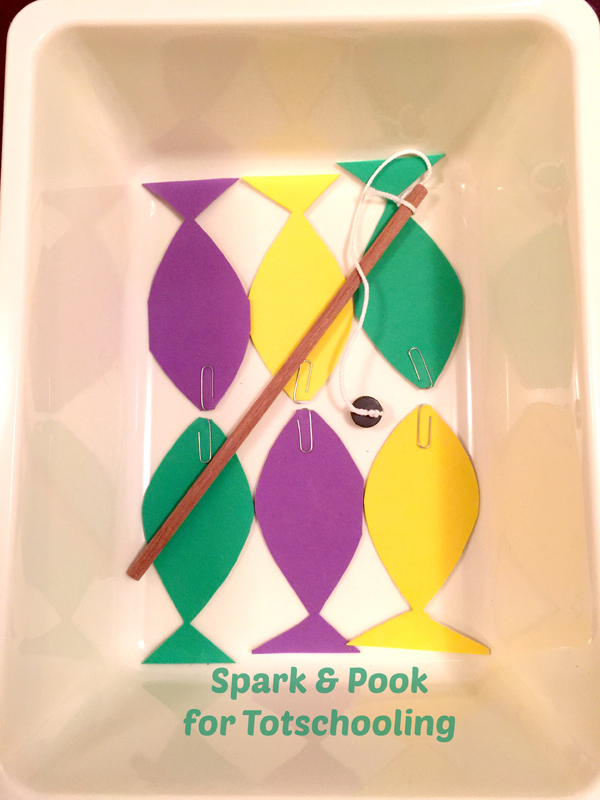

Assembly:

1 - Make the fish. I wanted more durable fish, so I printed the Gone Fishing Printable onto plain paper and then used that to trace and cut foam fish in a few different colors.  If you don't have or want to use foam, just print the fish onto colored construction paper, and then cut them out. I created a total of nine fish for our game, but you can make as many as you'd like.

2 - Once the fish are cut out, attach a paperclip to each fish in the place where a mouth would go.

3 - Assemble the fishing pole by tying a double knot of one end of the string to one end of the dowel rod (or the straight end of a wooden spoon). Using the other end of the string, tie a double knot around the dot magnet. (If using foam fish for the game, use two dot magnets together instead of one.)

4 - Place the fish inside their bucket (or makeshift pond).


Ways to Play:

- Since we had multiple players ranging from ages 2-3, I made a "fishing pole" for each fisher. The initial goal was simply for each child to "catch" a fish with their "fishing pole" (without touching the fish with their hands). For toddlers, this takes a good deal of concentration and coordination. Pooky and her friends played this game repeatedly taking turns to catch the 9 fish.

- Once children become skilled at using the "fishing pole," challenge them further by asking them to fish for a specific color. (This takes greater hand-eye coordination.)

- You can practice other skills by drawing shapes, numbers, or letters onto the fish and asking the child to "fish" for specific ones.   (To make the fish re-usable use a small sticky note instead of drawing directly onto the fish.) See the examples below.

- Write numbers on the fish (one on each) and have the child "fish" for the numbers in order. If they accidentally "catch" the wrong number, throw it back in.

- Draw some shapes that your child is familiar with on the fish so that there are multiples of each shape (i.e. three fish with a square, three fish with a circle, etc...) Create a landing spot for each type of fish so the child can sort their fish into the correct shape "bucket."

- Label the fish with some letters your child has been learning. Choose only a few letters and mark one fish with the capital letter and another fish with its corresponding lowercase letter. Then have the child fish for a specific letter and match the uppercase and lowercase into pairs.


Those are the ways we've been playing "Gone Fishing," but I'm sure there are many other ways you could play. Once Pooky knew how to play, we turned it into a Busy Bag activity. I take it out periodically and it's fun and educational all over again. You can find more busy bag ideas here.

Skills addressed with this activity:

- gross motor: hand-eye coordination
- social skills: taking turns
- math: counting, sorting, ordering, matching
- literacy: letter identification

Happy Fishing!


Meet Tiffiny:

I am a certified elementary school teacher turned stay-at-home mom. I’m a foodie, traveler, and avid reader. I love to share these joys with my husband, daughter, and the blogosphere. On my blog, Spark and Pook, you will find tips for traveling with children, children’s book reviews, and learn-though-play activities for toddlers and preschoolers.


Thursday, 5 March 2015

Making Animal Tracks

Happy Friday! Next up in my guest blogger series is Meghan from Playground Parkbench! Meghan blogs about kid's activities and crafts, parenting, financial and household tips. Some of my favorite posts are Montessori Animal Match, 9 Ways to Ease Daily Transitions, and Yoga for Toddlers. Today she is sharing a really unique activity and a free printable to go along with it.

Making Animal Tracks

Big M, my overly imaginative 3 year old, has become fascinated by animal tracks. It started last summer, going for walks on the beach boardwalk by our house. She loved to make footprints in the sand, and check out the tracks left behind by the seagulls. Fast forward a few months to winter, and she was over the moon that she could make visible footprints again in the snow… and better still, see all kinds of animal tracks in it as well. MerMer, our Texas Grandma, further fueled the fascination by sending us Whose Tracks Are These?: A Clue Book of Familiar Forest Animals for Christmas.


Now, every night after her bath, she stomps back and forth, and stares with pride at her “paw prints” all over the bath mat.

I’ve started correcting her:

“M, only animals, like bears and dogs, make paw prints. What do people make? FOOT prints!”

“Oh, right, Mama… foot prints!”

But her continued fascination with the topic, got me to thinking – how excited would she be to make her own paw prints and animal tracks? So I set out to make it our activity one snowy afternoon. 

Supplies:
Cardboard box
Animal Track Template Printable
Hot glue gun
Ribbon
Paint
Builder’s paper
Painter’s tape

Cost: Less than $10

Prep Time: 30 minutes, to make two sets of animal tracks

Clean Up Time: 10 minutes

While the girls had their daily quiet time (Lil’ M, my 18 month old, naps while Big M plays quietly in her room), I printed off page size animal tracks – a bear paw, dog print, wild cat print and a moose track. I used these as my templates to create pairs of animal tracks out of a cardboard box. I first cut out the outline of the track, then made a second cardboard layer with the track details, attaching the two layers with hot glue. To make the matching pair, be sure to flip the track over so you create a left and a right track.


To attach them to her feet, I made two 1.5” long incisions with an X-Acto knife, about a 3 year old foot width apart, and threaded through a 2-3’ long piece of ribbon. If I did this activity again, I would have added the ribbon BEFORE gluing on the track details, so the ribbon didn’t show up in our tracks. But that didn’t stop Big M from having a great time…

When quiet time was over, I told her we were going to make “paw prints!” She was so excited. I rolled builder’s paper down the length of our dining area, and taped it to the floor with painters tape. A roll of builder’s paper has over 150’ of paper on it, and is great for murals, wrapping gifts, or as a quick clean up surface for messy crafts. You can buy it for $5 to $10 on Amazon or at your local Lowe’s or Home Depot. We are still on our first roll after almost 2 years.


She wanted to try on the bear paws first. I tied them to her feet, and had her sit down on the floor while I painted a thick coat of paint on them. Then, I helped her stand up and let her walk up and down the paper. Next, she tried the moose hooves. As always, her 3 year old ingenuity drastically exceeds my own - when she tired of making the big animal tracks, she asked me if we could make some smaller ones with her plastic frogs and lizards.

While she ran to grab them, I cut a sponge in half, wet it and added some paint to it on a plastic plate. She spent another half hour making small animal tracks with her plastic animals. Lil’ M got in on the fun with these too. Now, every time we read Whose Tracks are These?, she talks about the time she made her own animal tracks.


To create your own animal tracks, download our free printable. It includes templates for four different animal tracks, as well as a fun Whose Tracks Are These? matching game to play after reading the book and making your own animal tracks.

What animals leave tracks around your house? Have you ever gone on a nature walk to look for tracks? If you enjoyed Making Animal Tracks, be sure to check out all our At Home Activities on Pinterest! 

Follow Meghan @ PlaygroundParkbench's board At Home Activities on Pinterest.


Meghan is mom to two girls, Big M (3) and Lil’ M (18 months). A former hedge fund professional turned stay-at-home mom, she was frustrated by the lack of online resources to find engaging, age appropriate activities for her toddler in her town. Her best information came from fellow parents while at mommy and me playgroups or on the Playground Parkbench as her kids played in the sandbox… she founded PGPB to capture all those tips and share them with other parents.

In addition to maintaining a database of local family-friendly events and activities, she also writes as the PGPB Guru, offering weekly household and parenting Tuesday Tips, shares kids’ crafts, adventures and recipes in At Home Activities, and informed by her former career, publishes Financially Savvy Fridays.

Monday, 1 December 2014

The Gingerbread Man Pretend Play Printable Activity

This post contains affiliate links.

As part of the Christmas Read & Play Blog Hop, I created a fun activity to go along with the classic story, The Gingerbread Man! This is a pretend play activity where kids can "bake" gingerbread cookies (free printables included) and then bring them alive by decorating them with playdough!


Gingerbread Cookies Pretend Play with Free Printable

We started off by reading the classic children's book The Gingerbread Man, and talking about how the gingerbread man came alive after being baked in the oven.


Then, I printed off and laminated these FREE Gingerbread Cookies printables. 


The girls played with their awesome and inexpensive Little Tikes Cupcake Kitchen, pretending to bake the cookies in their oven.


Then I gave my 3 year old daughter some playdough and helped her decorate the cookies. Now the cookies are ready to "eat"!


We also stood up the cookies inside playdough to really make them come alive!


I hope you enjoy reading The Gingerbread Man and playing with these pretend cookies. For more fun activities based on Christmas books, check out the Christmas Read & Play Blog Hop.